Setting up directories (part 2)
This is the second part of 'Setting up directories' make sure you have read the first part before you continue. Click here to read the first part.
In this tutorial I will show you how to set up the directories for an addon mission.
Go to your Hidden and Dangerous Deluxe directory and open the 'missions' folder you extracted in the previous tutorial. You'll see all the missions for Hidden and Dangerous Deluxe in the folder. I want you to right-click and create a new folder. You can name it anything you like but for this tutorial I will name it 'mymap'.
Open the 'mymap' folder up and now create five new folders then re-name them maps.mod, models.mod, sounds.mod, text.mod and missions. Your 'mymap' directory should now look like below.
Alright, let me explain what these directories are for. The maps.mod directory is where you put all the textures for models. For the models.mod directory you put all the new models you use in this folder. The sounds.mod is where you put all new sounds you use. Text.mod is used for text files which store mission names, descriptions and objectives. Finally the missions directory is where you put all your new missions.
You see the .mod folders are used for the source files of each mission. If you add a new model into your level you must put the model and it's textures into the maps.mod and models.mod directories. The missions folder is where you of course put all your missions. For each addon you can have up to 6 missions. If you have 7 or more missions you'll have to start another addon pack.
Open the 'missions' directory then create a folder and name it 'addon'. Now open the 'addon' directory then create a new folder and name it '1'. As I said before you can have up to 6 missions per addon pack. In the missions/addon directory these will be named from 1 to 6. Now in each mission folder (the folders numbered 1 to 6) you must have a 'game' folder. This is for the actual game mission. You can also have 'map' and 'briefing' folders. The map folder is used for the strategic map (when you press space in the game) and the briefing folder is where you put the mission briefing. The 'map' and 'briefing' are optional, you don't have to have them for the mission to work but you must have a 'game' folder.
Look below and you will see the basic structure for an addon mission. This is how you should always set up your folders before you start a level.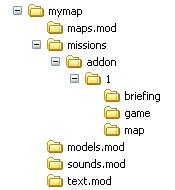
Save the image for reference later on when creating your own addon missions.
Well congratulations you now know all about setting up a addon mission directory. You can now go to the next tutorial 'Introduction to the editor' which will teach you all the basic's of mission editing.
Written by Jason Batten