Your first mission (part 5)
This is the fifth part of 'Your first mission' make sure you have read the previous parts before you start.
This is where we do some final tweaking to the map. There are a lot of little things in the map we must get rid of and fix.
If you turn up your speakers you'll hear the sounds of rain and thunder in the editor. These are the old background sounds to the level. They don't exactly match the level any more so let's get rid of them. Bring up the object selection screen and only have the sound group ticked. Select 'pilotspseak', 'mistnost1', 'ambi', 'mistnost2', 'hangar2' and 'sound' then press ok. Now delete them.
Again bring up the object selection screen and select all the sounds that you see in the picture below.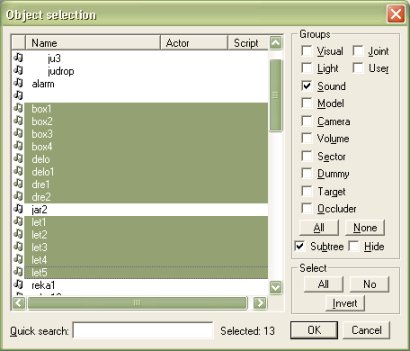
Now press ok and delete them all.
Bring up the object selection screen and select the model group. Search for 'aa_ju287', 'bmw', 'za_kubel' and '~05rain'. Select them all then press ok and delete.
Now we have to create the BSP-tree. Your probably wondering what the BSP-tree is, well it's the thing that computes all the 'collisions'. I told you a little about collisions in the 'Introduction to the editor' tutorial. Volumes are used to make collisions and collisions are exactly what they sound like. They are the things that stop you from walking through everything or even falling through the floor. Every time you create an object with volumes (collisions) you have to re-create the BSP-tree same with if you delete an object which had volumes. To create the BSP-tree go up to BSP-tree > Create or simply press Ctrl + B. You will notice in the bottom left little numbers rolling back. You must wait until this says 'tree constructed'. Now save your mission and reload it.
Go up to File > Scene Properties then double click camera and change the range to 150.0 like I have below.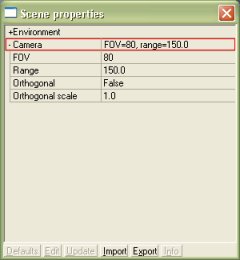
You may notice that now you can see further into the distance. It is important to change this to suit the map. The further you can see the slower the game will run so keep note for people on slower computers.
Go to View > Debug > Sounds or press Shift + Ctrl + S to show all sounds. Now go to Create > 3D Object > Sound or press Shift + S. When you create a sound a browser window will pop up, go to the Hidden & Dangerous Deluxe directory if you extracted all the files you'll have a sounds folder. Go to Sounds > Common > D5, there is only one sound in the file so select '4sa_win8.ogg'. Name the sound 'ambient' then press ok. Change the sound type to 'Ambient' and set the sound sectors to 'Primary sector'. Now you should be able to hear the wind sound all over the level.
Now it's time to get rid of some useless detectors. Detectors are the scripting or programming of the scene, they send and receive information. Such as they tell an enemy to attack you when you've reached a certain point in the map or they play a certain sound and notify you that you've completed an objective, things like that. So we must delete pretty much all the old scene programming. If you go to View > Debug > Dummies or simply press D you'll show all the dummies, also known as helpers. If you bring up your object selection screen you'll be able to find all the detectors you need to delete a lot quicker, note that detectors are a model and their actor is a detector. Below is a list of all the detectors you need to delete.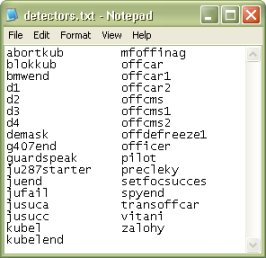
Almost finished this part of the tutorial we just have to delete some checkpoints. If you go to CheckPoint > Show or press Shift + Ctrl + K you will bring up all the checkpoints on the map. Most are yellow, some are green and some are red with blue connection lines. I have explained what they all are in the tutorial 'Introduction to the editor' but quickly the yellow checkpoints are for AI navigation, so the AI know where they are allowed to go on the map. The green checkpoints are used for patrols and telling the AI where to go. The red checkpoints with blue connection lines are used for vehicles, they tell them where to go. Now I want you to delete all the green and red checkpoints. Sadly there is no quick way to delete checkpoints apart from selecting them one by one and pressing delete.
Now to go on to part 6 of the tutorial, click here
Written by Jason Batten